With the release of Windows 10 coming near everyday, new features and tutorials to do new stuff on the young operating system from Microsoft are coming up. We have already covered many other Windows 10 and older tutorials that might help you in many ways and you can check them out here. In this post I will be walking you through a tutorial that will tell you how to change the mouse pointer size and color in Windows 10.
Without any further ado, let’s start.
The mouse pointer is the most used part of the Windows operating system. Since the start of the Windows setup to actual day to day usage. There are many pointers provided in the Windows OS already but you can also change the pointer size and color that many people don’t know how. We have written a tutorial that will help you do this in Windows 10.
Change Mouse Pointer Size and Color in Windows 10
Follow the steps one by one and don’t skip any step to properly change the pointer color and size.
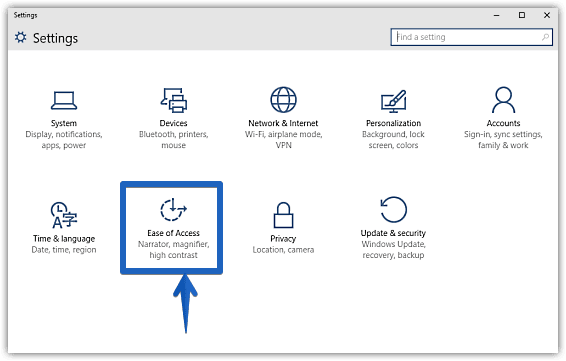
- Launch the new Modern UI Settings app and look for an option named Ease of Access.
- Click Ease of Access and this should open a new window with different options.
- Now you will see a bunch of other options in this new screen and on the left hand side of the screen, look for an option named Mouse.
- Clicking this option will open the Mouse section of the settings and you should now be able to see two other options named Pointer size and Pointer Color.
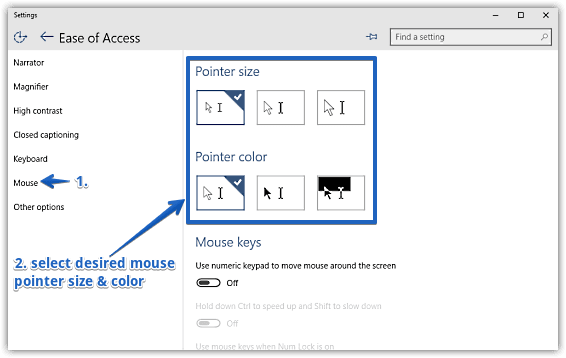
- Now you can set your favorite pointer size as well as color from this screen.
Verdict
The mouse pointer as I mentioned above is probably the most used part of the OS and hence it is very necessary that you have the option to customize it as per your needs. This option is actually meant for people who are differently abled but sometimes these options also work very well for other people.
So this was a small tutorial in which we showed you how to change your Windows 10 mouse pointer.
No comments:
Post a Comment