Showing posts with label HOW TO. Show all posts

Best Face Recognition Software to Unlock/ Login Windows 8

Protecting the Windows 8 with a password can become a tad bit boring at times.  Every time you log on to your PC or any other device with a Windows 8 OS, you need to type in your password in order to get access to the same. Monotonous, isn’t it? Wouldn’t it be brilliant if some other kind of protection was available for your Windows 8 devices? What if I tell you that you can actually password protect your Windows 8 device with the help of face recognition? Pretty intriguing, right? Yes! It is now possible to lock your Windows 8 device with the help of face recognition with the help of a few software which are easily available online in both paid and free versions depending upon the kind of protection you want.
These software are easy to download and install. This article deals with three of the best face recognition software to unlock Windows 8.

1. KeyLemon

Of all the various kinds of face recognition software to unlock Windows 8 that we have tested, this is by far the best. Developed by the KeyLemon company which is based in Silicon Valley with its headquarters in Switzerland, the software is available for use in both paid as well as the free version. According to the level of protection you desire for your Windows 8 device, you can choose, download and install the software in a pretty simple way.
After installation, all you need to do is get a license and KeyLemon is ready to use. It comes packed with multiple features which allow you to capture your image in various lighting conditions and with the accessory of your choice for the purpose of recognition. It also allows you to capture and save the images of those who try to access your Windows 8 device without your permission. It also aids in locking your device, the moment you step away from it. The software is also available in multilingual packs.
Keylemon

2. Rohos Face Logon

While typing in our password, it may so happen that we don’t take heed of our surroundings and which results in the leakage of our password and unnecessary access to our device by unwanted individuals. But, you don’t have to worry anymore. With Rohos Face Logon you now can stop these trespassers. Once you have downloaded and licensed Rohos, all you need to do is customize it according to your preferences and your device is completely protected.
It allows in super fast and easy access to the computer with the aid of the web cam and also allows the use of the USB as a key which can be used to unlock your Windows 8 device. One of the best features of this software is the fact that it allows registration of multiple users. It also deletes any poor images and storing the best quality ones. Along with negating the face recognition failure, it also allows you to hide the face recognition screen.
rohos-face-logon

3. BananaScreen

Last but not the least; BananaScreen is another face recognition software which is perfect for protecting your Windows 8 device. The most interesting fact about the software is the speed with which it allows the locking and unlocking of the device on which it is installed. Easy to download and install, BananaScreen is super efficient in preventing all the trespassers from coming close to your contents. All you need to do is download, install and plug in your webcam and register the faces which will be granted access to the computer and the software is ready to use.
Although only in its beta version, the software is quite promising and ever developing and we surely hope that once fully launched it will be a surprise to all of us. You can set your preferred configuration in order to customize the software so that it can lock and protect your device when required.
bananascreen
We hope that these software were interesting enough to bring a change to the regular password protected design that you usually use. The face recognition software to unlock Windows 8 are fun to use and at the same time provides ample protection to your device.

How to Change Mouse Pointer Size and Color in Windows 10

With the release of Windows 10 coming near everyday, new features and tutorials to do new stuff on the young operating system from Microsoft are coming up. We have already covered many other Windows 10 and older tutorials that might help you in many ways and you can check them out here. In this post I will be walking you through a tutorial that will tell you how to change the mouse pointer size and color in Windows 10.
Without any further ado, let’s start.
The mouse pointer is the most used part of the Windows operating system. Since the start of the Windows setup to actual day to day usage. There are many pointers provided in the Windows OS already but you can also change the pointer size and color that many people don’t know how. We have written a tutorial that will help you do this in Windows 10.

Change Mouse Pointer Size and Color in Windows 10

Follow the steps one by one and don’t skip any step to properly change the pointer color and size.
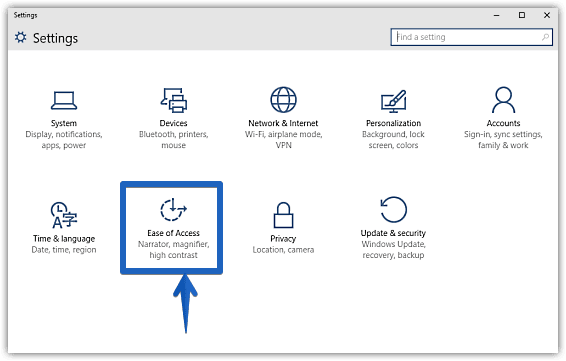
  • Launch the new Modern UI Settings app and look for an option named Ease of Access.
  • Click Ease of Access and this should open a new window with different options.
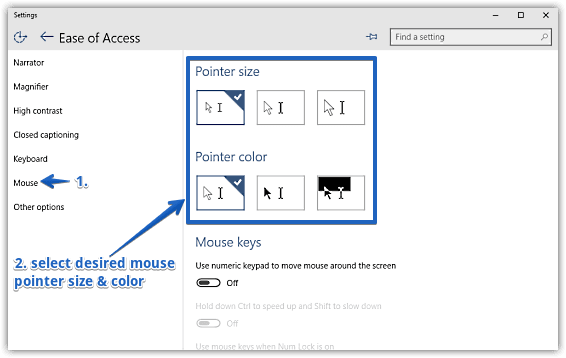
  • Now you will see a bunch of other options in this new screen and on the left hand side of the screen, look for an option named Mouse.
  • Clicking this option will open the Mouse section of the settings and you should now be able to see two other options named Pointer size and Pointer Color.
  • Now you can set your favorite pointer size as well as color from this screen.

Verdict

The mouse pointer as I mentioned above is probably the most used part of the OS and hence it is very necessary that you have the option to customize it as per your needs. This option is actually meant for people who are differently abled but sometimes these options also work very well for other people.
So this was a small tutorial in which we showed you how to change your Windows 10 mouse pointer.

How to Create A Windows 10 Bootable USB Drive

As Microsoft prepares its much anticipated Windows 10 operating system, the excitement about this upcoming OS is increasing. Microsoft wants to make this version as advanced and useful as possible because this will be the last version of Windows. This goal has already been evident in all the events at which Redmond based company talked about its upcoming operating system. While the final release is still a few months away, a Technical Preview is already out that early adopters like you and me can try to get a feel of Windows 10 before it’s rolled out officially. All you need to do is to create a bootable USB disk using its ISO and then install the Preview on your personal computer.
How do you create a Windows 10 bootable USB disk? Don’t worry, pal. You’re in the right place!

Pre-requisites

Before you can create a Windows 10 boot disk, you’ll have to ensure the availability of following things:
  • A 4GB Pen drive for 32-bit version or 8GB Pen drive for 64-bit version, depending on the configuration of your computer,
  • Rufus tool that’ll help you in creating the boot disk,
  • Windows 10 Technical Preview ISO – Can be downloaded from here,
  • And a Windows PC.
Once you’ve all these things, you can get started with the procedure given below:

Steps for creating Windows 10 boot disk

  • Connect your flash drive to PC.
  • Navigate to the location where your downloaded files are saved by default (or the location where you downloaded Rufus, if you didn’t save it to the default download location) and launch Rufus. A thing that I like the most about this tool is its easy setup – you don’t even need to install it on your computer!
  • In the Rufus window, click the checkbox before “Check device for bad blocks”option. This step is optional, but is important for the sake of your computer’s security. I didn’t do it and my device turned out to be fine, but a bit of extra precaution now can save you from more serious problems later.
  • Select your USB drive and partitioning scheme as shown in the image given below:
windows-10
  • Now click on the small ISO icon shown next to the ISO dropdown menu. You can see it in the image given above (pointed by the red arrow).
  • After clicking navigate to the location where you downloaded your Windows 10 Technical Preview image and select the image file.
  • After selecting the file, hit “Start” button and wait for a while. In a few minutes your bootable USB drive will be ready!
That was easy, isn’t it? Now you can use your recently created Windows 10 bootable USB drive to install Windows 10 on your computer. Just a word of caution before you leave – install it as a second operating system on your PC and also backup your data before starting the installation process. It’s a Technical Preview… who knows if it messes something up with your computer?

How to Run WhatsApp on Windows 10

Windows 10 is most probably one of the most awaited softwares of this year. Microsoft has finally announced an official date for the launch of the same which is going to be the 29th of July of this very year. Users are pretty excited because the speculation of the software has some pretty promising features which are going to make the user interface super easy and fast at the same time. In addition, it is going to combine the strength of the Windows version 7 and 8.1 so it will be pretty familiar to the users. Another amazing fact about the new Windows 10 is that it will be available for free to all the users of Windows version 7 or 8.1 for a year after which you may buy the software. This will boost the user database and make it even more popular. Windows 10 is also going to ease the portability of Android and iOS so that the number of available apps will also increase.
WhatsApp, probably the most popular and vastly used cross platform messaging facility which allows users to send and receive messages for free if they have a working internet connection, is now available for PC too and installing it on Windows 10 is going to be super easy. The main reason behind using the WhatsApp app on your Windows 10 is the utilization of the app on your Windows phone or on your PC when you are not close to your phone or when your phone is not accessible. This article is dedicated to solving all the problems that you may face while running WhatsApp on Windows 10 and will provide you with a complete guide on how to run it.

Running WhatsApp on Windows 10 by WhatAppWeb

Previously, you needed an Android emulator in order to run the WhatsApp app on your PC but that caused some hassle. The emulators such as Bluestacks are tough to install on even some of the latest PC as it takes up a lot of space on the Ram of the computer, hence slowing it down considerably. But you need not worry any more. WhatsApp is now available in a web version which doesn’t require an emulator.
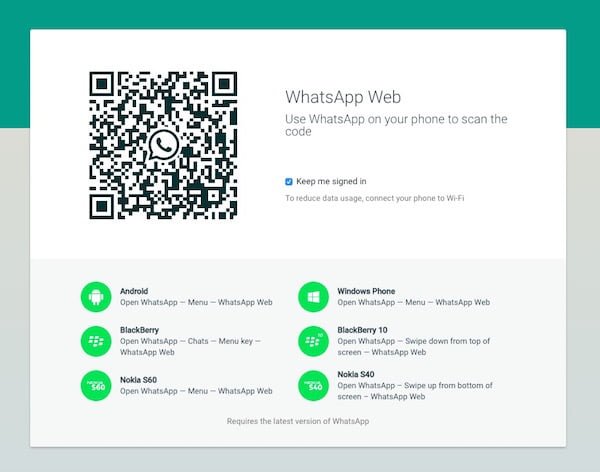
1. All you need to do is go to the official site of WhatsApp software and click on the “WhatsApp Web” button available on the site. This will allow you to use the WhatsApp app on your Windows 10.
whatsapp-web
2. Once the WhatsApp window is available on the Windows 10 screen on your computer, you will have to scan the available QR code via your phone in order to link the two accounts and your WhatsApp is ready to use on your Windows 10.
whatsapp-web

Running WhatsApp on Windows 10 by BlueStacks

1. If you want to download the software on your Windows 10, all you need to do is download a preferable Android emulator app like Bluestacks and click install in order to run it on your computer.
whatsapp-web
2. Download WhatsApp APK file or once BlueStacks installed, you need to open the window available and click on the WhatsApp app button available on the window of the emulator. Double clicking the WhatsApp icon will automatically allow you to download the WhatsApp for Windows 10. Up on downloading, it will be saved as an APK file on your computer which you need to install.
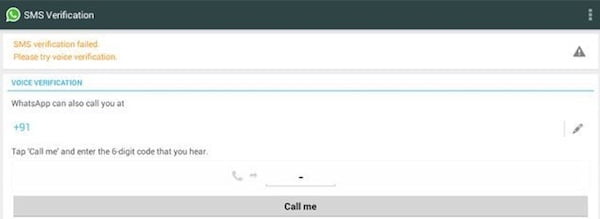
3. Once complete, the WhatsApp app will ask you to insert your mobile number after opening it. Insertion of the same will make WhatsApp send you an SMS or an automated call to verify your account and will send you a code which you need to enter into the given field. Once done, our WhatsApp app is ready to use.
whatsapp-web
However, Bluestacks won’t allow you to use the same WhatsApp account on your phone and PC. In order to run the same WhatsApp account on both your Windows 10 and your phone you might have to consider using softwares like AirDroid.
Well, these are probably two of the best processes by which you can use WhatsApp on your Windows 10 PC. Hope we have been able to quench all your questions related to the topic and you will now be able to install the app on your Windows 10 PC with ease and enjoy WhatsApp.